Topics
- Installation
- Options Page – Setting up your content sources
- Create Campaign Page – Starting your first autoposting campaign
- Campaigns Page – Managing your autoblogging campaigns
- Curation Page – For manual bulk content building
- How to …
Installation
To install WP Robot on your own WordPress blog please follow the steps below.
- Save the WP Robot plugin file to your computer with the download link you received in your email after purchasing. The plugin comes in form of a .zip file, which you do not need to extract yourself.
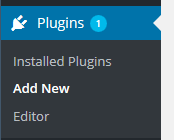
- Log into your WordPress weblog’s admin area and navigate to “Plugins” > “Add New”.
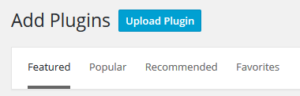
- Press the Upload Plugin link near the top of the page.
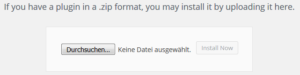
- Click on “Search” and select the WP Robot plugin file from step 1 on your computer. Then press “Install Now”.
- Once the installation completes press the link to “Activate” WP Robot.
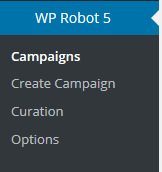
- Go to the new “WP Robot 5” entry in your main WordPress navigation on the left side.
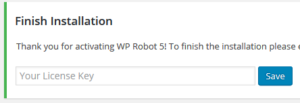
- To start using WP Robot you need to activate your license by entering your license key (which you can find in your purchase confirmation email) into the respective field and pressing the “Save” button.
- Now that the installation is complete you should continue to the Options page, where you can configure the content sources you want to post (see below).
Options Page
On the Options page you can activate and deactivate the content sources you want to use in WP Robot as well as configure all their settings.
Choose Sources Tab

The “Choose Sources” tab on the Options page.
The default tab on the Options page displays a list of all sources that are available in WP Robot. You can choose to order the long list of sources by category (to find all affiliate sources for example) or language (e.g. to find all German sources) by clicking on the respective links.
To activate a new source simply check it by clicking on its name and then press the “Save Selections” button. After your changes were saved a new settings tab for your activated source will appear at the top of the page.
To deactivate a source uncheck its box and press “Save Selections”. You can de- or reactivate sources at any time and activating multiple sources together is also possible.
Settings Tabs
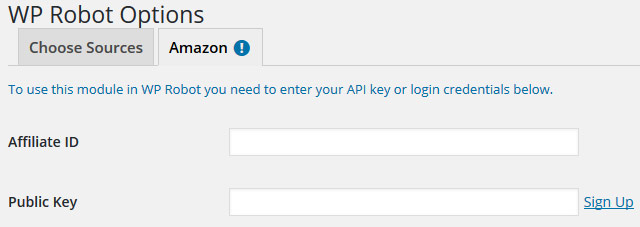
The upper part of the Amazon settings tab.
For each content source you have activated a settings tab will be displayed at the top of the page.
Clicking on the tab brings you to the options panel which contains all settings for this specific source. While many are self-explanatory you can find explanations for most important settings directly next to them within WP Robot 5.
After making changes you can save them with the “Save All Options” button at the bottom of each tab. The button saves the settings for all your sources and tabs.
Important: Many sources require that you enter your own API keys or account credentials for them to work. Those sources are marked with a “!” behind their name if the credentials are still missing. On the “Choose Sources” tab you can find a sign up link for each source that requires an account, which you can follow to sign up. Most sources require a free account to track your usage or to credit affiliate commissions you can earn to you.
Source Templates
Below the settings on each of your sources tabs you will find a separate “Templates” section. These templates define the look of posts using the source they belong to. We recommend editing them to advanced users only, since it requires some knowledge of HTML and the WP Robot tag system.
Create Campaign Page
On the “Create Campaigns” page you can, as the name implies, create campaigns for autoposting content to your WordPress blog.
What is a campaign?
You can think of them as something like an autoblogging task. The campaign allows you to tell WP Robot 5 what kind of content you would like to see posted to your site, at which interval and about which topics.
Creating a basic campaign
While the campaigns page offers you many different settings to give you as much control as possible over the autoblogging process many of them can be left at the default value if you just want to start posting quickly. Below is a short list of steps for beginners that are required to create a simple first campaign:
- Enter your desired post interval in the form field starting with “Schedule”. This determines how often posts are created on your site automatically, e.g. enter “5” to create a new post every 5 hours.

- Enter your keywords into the “Keywords” field. Keywords define the topics you want to create content for. You can either enter a single keyword or any number of keywords, with one per line.
- Enter your categories into which posts shall be placed. You can either enter a single category or one category per keyword. If you enter multiple they work in pairs with keywords on the same line, e.g. the category on line 2 is used for posts of the keyword on line 2, etc (see example picture).
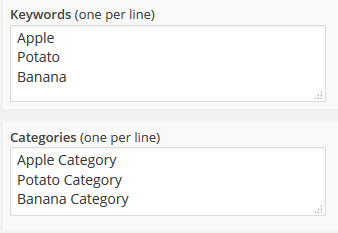
Three keyword/category pairs.
- Add at least one post template to your campaign. To do so click the “(choose one)” dropdown in the Templates area and select one of the content sources. Note that only sources previously activated and configured on the “Options” page are listed here.
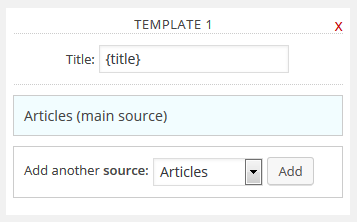
Display of a default template after adding it.
- You can now press the “Create Campaign” button to finish. All other settings are either optional or can be left at the default value.
All settings on the campaigns page explained
1. Main Settings
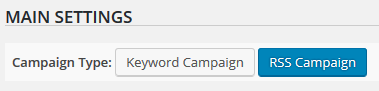
- Campaign Type – This setting is only shown if you have activated RSS feeds on the Options page. For more details on creating RSS campaigns please see here.
- Campaign Name – For organization purposes you can give campaigns any name of your choice.
- Schedule – Defines how many posts are created when the campaign is run as well as how often the campaign is run automatically. If you for example enter 2 in the dropdown and 5 hours as interval then 2 new posts will get created for this campaign every 5 hours.
- Post Status – Allows you to create new articles as drafts which you can manually review first.
- Post Type – Allows you to choose whether the campaign shall create posts, pages or articles of a custom post type (e.g. WooCommerce products).
- Author – Allows you to choose a user account from your blog which will be used as author for this campaign.
- Keywords – Defines the topics for which this campaign will gather and post content. You can enter any number of keywords, one per line. If you enter multiple keywords one will be randomly selected for each post by this campaign.
- Categories – Defines the categories new posts will be added to. You can enter one category for each of your keywords on the same line (see example picture above) or a single category for all your keywords. Categories that do not exist yet will automatically get created by WP Robot.
2. Templates
You can add any number of templates to a campaign in WP Robot. Each time the campaign is run one of the templates will be randomly selected for the post. This ensures that you get a good variety of different posts, making your automatic content look more natural.

To add a template all you need to do is click on the “(choose one)” dropdown and select the content source of your choice. Please note that you need to activate sources on the Options page first for them to be available here.
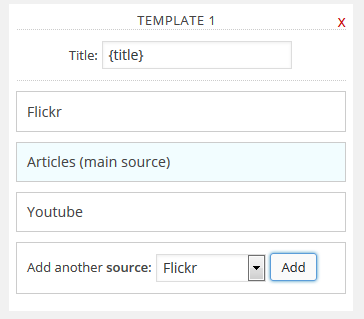
A template with multiple sources.
Furthermore you can also add any number of different content sources to a single template in WP Robot. This allows you to create more complicated articles by combining the different sources available in the plugin. You could for example have a template that automatically posts an Amazon product and then adds related Youtube videos and articles to the post.
When adding additional sources to one of your templates you have the following options:
- Source – The new source you want to add to your template. Of course you can add the same source multiple times (to post 3 Youtube videos in one post for example).
- Location – Where to add the new source specifies the order of the content in the final posts.
- Keyword – By default the campaign keyword set in the “Keywords” field will be used for all sources in a template. Alternatively you can select “Use title of main content source”. In this case the campaign keyword is used for the main source (marked in blue) and the title returned by the main source is used for the additional source. This can result in more targeted content. For more details please take a look at the advanced template examples.
- Probability – To randomize your posts you can specify a probability below 100% for the new source to be added in each post.
3. Optional Settings
- Exclude Keywords – If any of the keywords you enter here is found in a post by the campaign it will be skipped.
- Require Keywords – This setting allows you to specify a list of required keyword. Posts do not get created unless they contain at least one of the keywords entered here.
- Replace Keywords – Allows you to automatically replace certain keywords, text or links with other content of your choice in all posts by this campaign. Please follow the syntax instructions displayed next to the setting inside WP Robot.
- Custom Fields – Allows you to add any number of custom fields to posts created by the campaign. Many themes use custom fields to specify additional post data such as product prices, etc.
- Translation – Makes it possible to automatically translate all posts with Google Translate. Simply select the original language (usually English) and the language you want to translate into. You can also specify a second and third language, for example to rewrite the content back into English.
- Rewriting – Allows you to activate rewriting for all posts by this campaign with one of the supported spinning software. Please note you need to activate and configure your spinner on the Options page first.
4. Module Settings
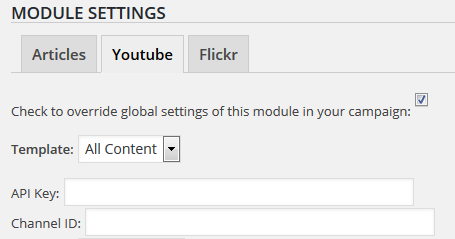
Activated overriding for Youtube settings.
The module settings allow you to override global settings from your Options page for each specific campaign you create.
Once you add templates to your new campaign a settings tab will be shown here for each source used in your templates. After clicking on the tab you press “Check to override global settings of this module in your campaign”, which allows you to edit and change your Options page settings and save them with your campaign.
Why would you want to override your Options page settings for a specific campaign? Here are two examples.
Example 1: You are building a local classifieds site with Oodle as source. By overriding the “location” module setting you can create multiple campaigns each targeting different areas, e.g. one campaign posting classifieds for Chicago, one for New York, etc.
Example 2: You are building an Amazon affiliate site in multiple languages. By overriding the setting in each campaign you can create multiple campaigns for posting amazon.com products as well as amazon.de, amazon.es, etc products with different campaigns.
Campaigns Page
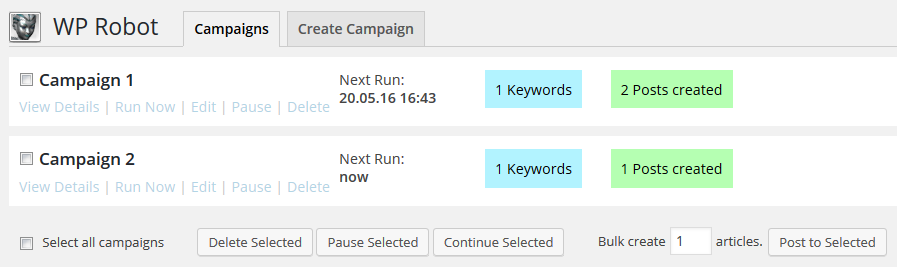
The campaigns page displays all the campaigns which you have created on a site and allows you to manage and control them. The list contains details on the campaign names, as well as its keywords, the next automatic post date, the number of posts already created and the number of errors if any were encountered.
For each campaign shown you have the following actions available:
- View Details – Opens the campaign log, which shows you a list of all posts that were created by this campaign.
- Run Now – Clicking this link will execute the campaign manually and create a single post.
- Edit – Brings you to the “Create Campaign” screen and allow you to edit your campaign.
- Pause / Continue – Allows you to stop and resume autoblogging for the campaign.
- Delete – Will delete the campaign entirely. Any posts created by the campaign will not be affected.
At the bottom of the page you can find the following bulk actions which you can perform for multiple campaigns. Simply check the campaigns you want to modify and then press the respective button to delete, pause or run all selected campaigns.
Campaign and Error Log

You can view the log entries for any campaign by clicking on the “View Details” link or alternatively on the “X Posts Created” or “X Errors” buttons.
The log contains details on each campaign run with the date and a link to the post that was created. Next to the link for each created post you can find a trash icon you can use to delete the post as well as an edit icon which brings you to the WordPress editor screen.
If creating posts failed the log will contain details on what the reason was as well as list any errors that were encountered.
Curation Page
The curation page is an alternative way of posting content to automatic campaigns which was introduced with WP Robot 5. It is not fully automatic but instead gives you more control and manual review over the resulting articles.
Differences to automatic campaigns
- Manual review of all imported items before publishing them.
- More control through the building-blocks principle – combining multiple sources to build the content you want.
- Bulk posting with randomized dates and user accounts (for example to fill a new site with backdated posts)
- Two additional manual import options: PLR articles and CSV datafeeds
The Curation Page Posting Process
The process of creating and publishing posts with the curation page is split into three phases, separated by the tabs at the top of the page:
1. Build Content
You start by importing and creating the content from the content sources of your choice which you in the end will post to your site. Please note that all sources you intend to use need to be activated on the Options page first. The process of loading content from a source works like this:
- Click on the “What do you want to do?” dropdown
- Select “Create API Content” (see here for details on PLR articles and CSV datafeeds)
- In the form that opens you need to enter the number of items you want to import (10 by default), the source which WP Robot shall use and the topic to search for, which can be any keyword of your choice.

- After pressing “Go” the content will be loaded and displayed in the preview section of the “Curation” page.
- You can now repeat the same steps as often as you like to import more content and combine it with your existing results. When importing the second time you will be asked whether you want to add the new content to the beginning or end of your existing items (shown in the preview section) or to create new articles instead.
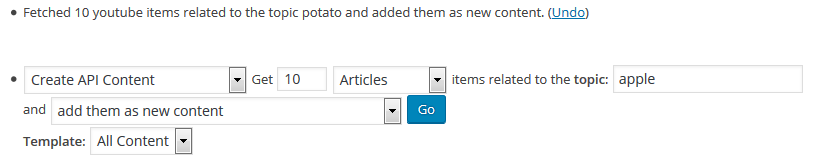
As mentioned you can combine the steps above as often as you like to combine multiple content sources in one article. This allows you to build more complex content, which could for example consist of one Amazon product, full text article, a Youtube video, etc.
The preview section below the form displays your results. Each separate item will become its own article or post once you publish it on your site. With the links in the black box to the left of the preview you can delete items which you do not want to publish as well as rewrite items if you have a spinner activated on the Options page.
2. Tools and Rewriting
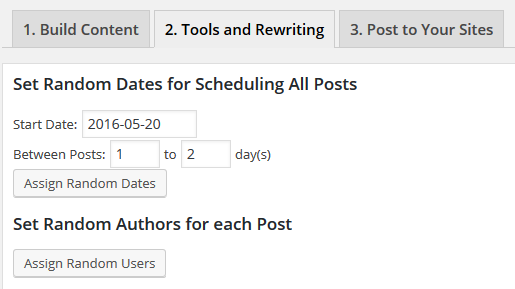
The tools page offers you several options you can apply to all your articles in the preview section before publishing them to your site. The following tools are available:
- Set Random Dates – If you want to schedule the articles in the preview area, so that they get published to your site slowly over time you can do so with this tool. Simply select the start date (the date on which the first post will get published) as well as the desired range of days between individual posts. After pressing the “Assign” Random Dates” button you can see the chosen publish dates next to each article in the preview area. If you do not like the results you can repeat the process. You can also use this tool to backdate posts by setting a start date in the past.
- Set Random Authors – This tool allows you to set a random author for each of the articles in the preview area before posting them. Simply press “Assign Random Users” and one random account will be chosen and displayed next to each article in the preview area.
- Rewriting – If you have activated a spinning software on the Options page you can use it to rewrite all articles in your preview section in bulk. Simply click “Rewrite all articles below”, select your spinner from the dropdown and press the “Rewrite Now” button.
3. Post to Your Site
Once you are satisfied with the content shown in the preview area go to the third tab to publish it on your site. On the tab the following settings are available, most of which are the same as in your WordPress post editor:
- Category – The WP category to use for posting.
- Post Type – The desired post type.
- Post Status – Defines the status of new posts, published by default.
- Author Username – Set up the author for all posts. Note that if you used the “Set random authors” tool it will override this setting.
- Date (optional) – Set up the post date for all posts. Note that if you used the “Set random dates” tool it will override this setting.
- Parent (optional) – If you are creating pages you can specify a parent page by entering its ID here.
- Add Comments – Some content sources support and import comments, which are shown in the preview area. If you want to post them you can check the respective setting here.
After pressing the “Create Posts Now” all the articles in your preview section will get created on your site.
How to …
Post RSS Feeds
Creating RSS campaigns and autoposting RSS feeds to your WordPress blog works in almost the same way as creating campaigns for any of the other content sources (see the chapter on the Create Campaigns page for details) with just a few differences. Here is an outline of the steps you need to follow to post RSS feeds:
- If you have not done so yet go to the “Options” page and activate the RSS source by checking “RSS Feeds” and pressing the “Save Selections” button.
- Go to the “Create Campaign” page.
- Next to “Campaign Type” press the “RSS Campaign” button.
- A new “RSS Feeds” field has been added. Here you need to enter the RSS feeds you want to post to your site. Like with keywords you can enter a single feed or multiple feeds, one per line.
- You also need to enter categories in which your posts will be placed. Like in a normal campaign categories belong to the feed on the same line (see example below).
- When selecting “RSS Campaign” the default RSS template has already been added to your campaign. There is no need to change it but if you wish you can add additional sources to your template (or add new templates).
- Finally enter the “Schedule” like you would in a normal campaign, e.g. to post every 5 hours.
- All other settings (including Keywords in this case) are optional. Click “Create Campaign” to finish creating your RSS campaign.
RSS Feeds and Keywords
In an RSS campaign feeds and keywords work in pairs, with feeds and keywords (and categories as well) on the same line belonging together. Please see this example for a demonstration:

Three RSS feeds, each with an associated keyword and category.
That means if you want to use a single feed but multiple keywords you need to simply enter the same feed URL multiple times. Like in this example:
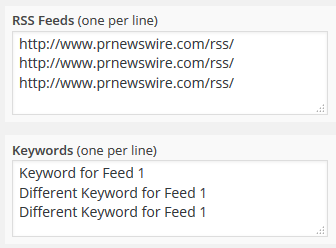
Setup for 1 RSS feed with multiple keywords.
Upload PLR Articles
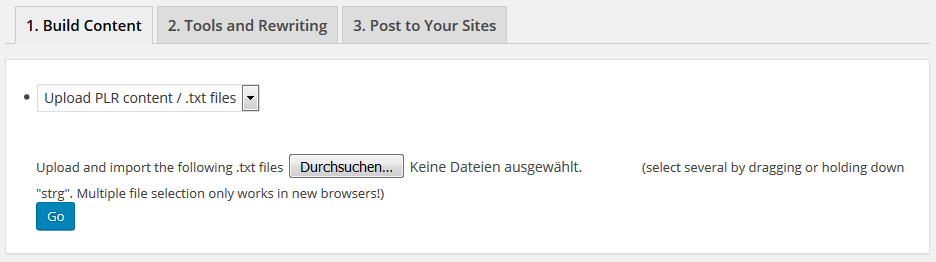
In WP Robot 5 you can bulk upload and post PLR articles in .txt file format on the “Curation” page. Here are the steps you need to follow:
- Go to the “Curation” page.
- Click on the “What do you want to do?” dropdown.
- Select “Upload PLR content / .txt files
- Press the “Search” button and select the PLR files on your computer. You can select any number of text files.
- After clicking “Go” the selected files will be imported. When importing PLR articles the first line of the text file is used as the title, while all remaining lines are used as the content body.
- All imported files are now shown on the “Curation” page for you to review. You can post and schedule them to your sites by going to the third tab. For details and other settings please see our tutorial about the “Curation” page.
Import CSV Datafeeds
Importing CSV datafeed files is possible on the “Curation” page in WP Robot 5 as well by following the steps below.
- If you have not done so yet go to the “Options” page and activate CSV uploads by checking the “CSV Datafeeds” source and pressing “Save Selections”.
- Go to the “Curation” page.
- Click on the “What do you want to do?” dropdown.
- Select “Upload a Datafeed / .csv files”
- Press the “Search” button and select the datafeed file on your computer. You can select one file per upload but the file can contain any number of products.
- By changing the “and parse the first X items” setting you can change the number of products that shall be imported.
- After clicking “Go” the content will be imported..
- All imported products are now shown on the “Curation” page for you to review. You can post and schedule them to your sites by going to the third tab. For details and other settings please see our tutorial about the “Curation” page.
Automatically Post WooCommerce Products
Products are a custom post type added by the popular WooCommerce plugin. WP Robot 5 can easily create automatic articles for any custom post types such as “products”. Please follow the steps below to create a campaign for WooCommerce products:
- Go to the “Create Campaign” page.
- Enter your keywords, categories and other required campaign settings as explained in the create campaign section.
- Click on the “Post Type” dropdown and select “Product” (or any other custom post type of your choice).
- Note that when using a custom post type the “Categories” setting will also use categories for said post type (and not the WordPress post categories).
- With many custom post types it makes sense to specify custom fields in your WP Robot campaign under “Optional Settings” as well. Please see below for possible WooCommerce custom fields you might want to use.
- Click “Create Campaign” to finish.
WooCommerce Custom Fields
[list of woocommerce custom fields]
Use Custom Fields
Custom fields are sets of data that can be added to WordPress posts. Many WordPress themes and plugins require custom fields to populate special sections or values in their design. An affiliate theme might use the “price” custom field for example to display the product price or a video theme might expect a “youtube video id” field to automatically load Youtube videos into their player.
In WP Robot 5 you can specify custom fields when creating a new campaign: Under “Optional Settings” you can find the “Custom Fields” section where you can enter any number of custom fields.
Each field consists of a name and a value. The name is defined by the theme or plugin you are creating the custom field for. The value can be any text or keywords of your choice as well as any of the template tags supported by WP Robot. You can find all template tags by navigating to the “Options” page > settings tab of the source in question.
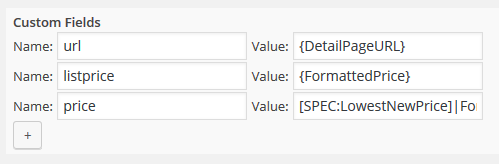
Amazon campaign with 3 custom fields.
Here are some examples of useful template tags:
Amazon
Affiliate Link: {DetailPageURL}
Price: [SPEC:LowestNewPrice]|FormattedPrice|[/SPEC:LowestNewPrice]
Youtube
Video ID: {videoId}
Video Title: {title}
Flickr
Image URL: {url_m}
Image URL (large): {url_l}
Linkshare
Price: {price}
Affiliate Link: {linkurl}
Commission Junction
Price: {price}
Affiliate Link: {buy-url}
Advanced Template Examples
Uninstall WP Robot
If you want to uninstall WP Robot 5 completely please go to the “Options” page > “Choose Sources” tab and scroll down to the bottom. Click the “Uninstall WP Robot” button, which after selecting yes in the confirmation popup will delete all options and campaigns created with WP Robot. Any articles that were posted to your site are not affected.