WP Robot Quick Start Documentation
This quick start tutorial is meant to give you an introduction to WP Robot. It shows you how to install the plugin, how to configure the important options and how to start autoposting with your first campaign in simple steps. Not all settings and possibilities are explained here, for that please refer to the full documentation
Follow the instructions chronologically. They take you from installation through setup to creating your first campaign.
Installation
1. Save the WP Robot plugin to your computer with the download you received in your email after purchasing.
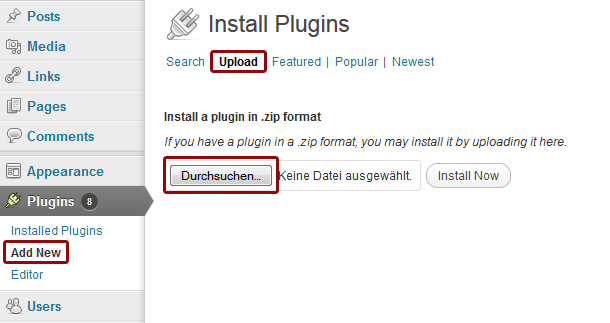
2. Log into your WordPress weblog. Go to "Plugins" > "Add New". Press the "Upload" link in the navigation links at the top and then press the "Search" button. Select the WP Robot file you saved in step 1 from your computer and press "Install Now". Afterwards activate WP Robot.
3. Go to the new "WP Robot 4" entry in your main WordPress menu.
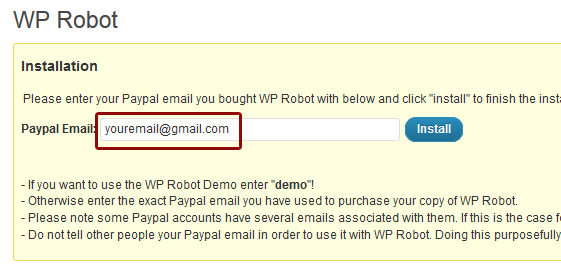
4. Enter your Paypal email and press "Send" to finish the installation.
Setting Up The Options
1. Go to "WP Robot 4" > "Options" in your WordPress admin area.
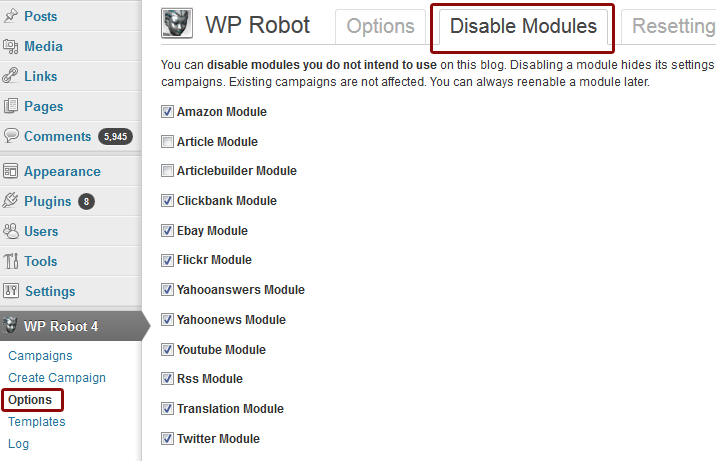
2. Click on the "Disable Modules" tab at the top. Here you can disable modules you do not want to use, for example because they do not support your language or you have not signed up for their API program yet. Uncheck modules you do not need and press "Save Selection".
3. Go back to the main "Options" by clicking the tab at the top.
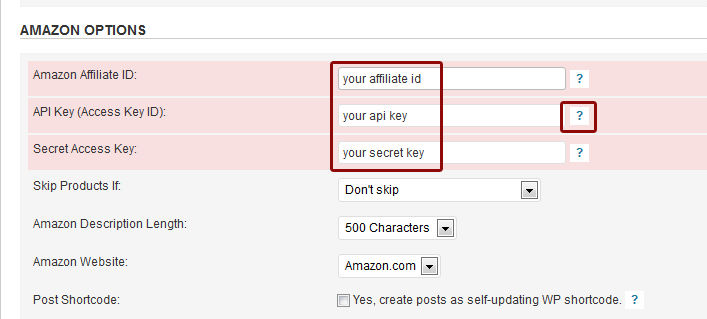
4. Several modules require that you enter your API account details before you can use them. ALL REQUIRED API SETTINGS ARE MARKED IN RED ON THE OPTIONS PAGE. Signing up for an API account is free. Click on the "?" next to an API options field marked red to GO TO THE SIGNUP PAGE.

5. All other options besides the ones marked in red are set by default. You do not need to change them to start using WP Robot but can to fine tune your results. Hover over the "?" next to each setting to get an explanation of what it does.
6. After changing any settings save your changes by pressing "Save Options" at the top or bottom.
Creating A Campaign
Campaigns control what content gets posted by WP Robot. You can have as many campaigns as you want and each campaign can have an unlimited number of keywords. The keywords you enter define what topics WP Robot will search and post content for.
1. To create a campaign go to "WP Robot 4" > "Create Campaign".
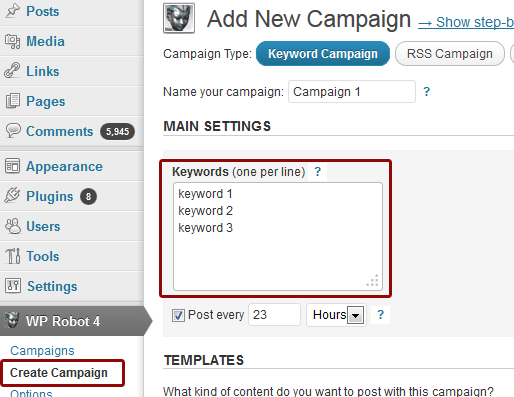
2. Enter the keywords you want to post content for in the text box marked "Keywords". You can enter any number of keywords, with each of them on a new line.
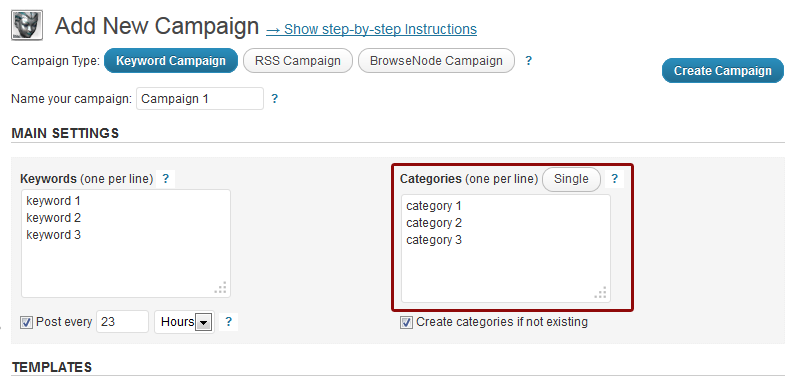
3. Enter the WordPress categories you want posts WP Robot creates to be categorized into in the "Categories" field. You can:
- Enter a single category name. Then all posts for all keywords go into this category.
- Enter one category per line like in the "Keywords" box. Then each post for a keyword goes into the category on the same line.
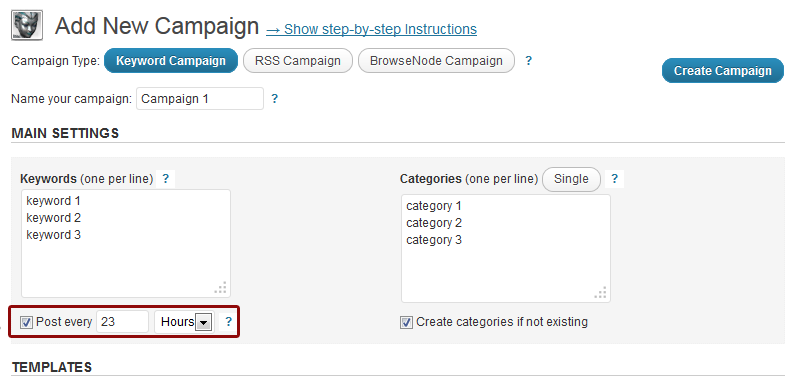
4. Set the post interval in the "Post Every" field. It decides how often WP Robot automatically creates a post.
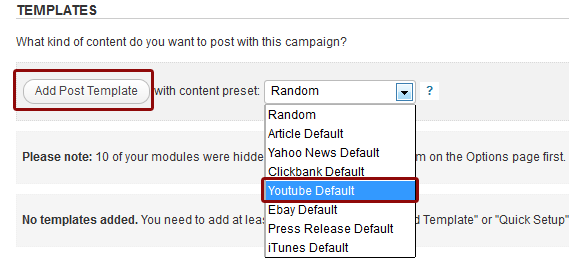
5. Set up your Templates. A template decides how your final posts will look and what kind of content they will contain.
To add a new template:
- Press the drop down box that says "Random".
- Choose the module that you want to use in this campaign. Only modules you have configured on the Options page show here.
- Press the "Add Post Template" button to add the template.
You can repeat those steps and add any number of templates to your campaign. For each post one will be randomly selected.
Tip: You can use the "Quick Template Setup" button to add all your templates at once.
6. Press the "Create Campaign" button to finish and create your campaign.
Managing and Bulk Posting Your Campaigns
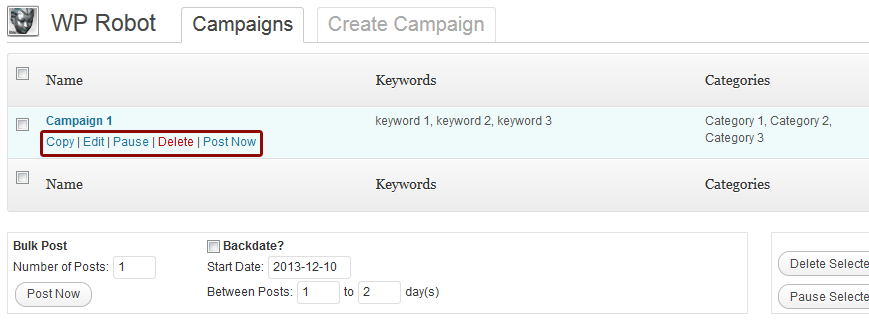
After you have created campaigns they show up on the "Campaigns" page. Here you can do the following:
- Delete Campaigns: Either with the "Delete" link next to each campaigns name or by selecting the checkboxes next to them and pressing the "Delete Selected Campaigns" button.
- Pause Campaigns: Using the "Pause" link next to a campaign name stops it from autoposting.
- Edit Campaigns: Using the "Edit" link allows you to change a campaigns settings.
- Copy Campaigns: Using the "Copy" link brings you to the create campaigns page with the same settings of the campaign you want to copy.
- Create Manual Posts: The "Post Now link next to each campaign creates a single manual post for this campaign. A random keyword and template will be selected (of there are more than 1 in the campaign).
- Create Bulk Posts: Enter the number of posts you want to create in the "Number of Posts" box and press "Post Now" to built more than 1 article.
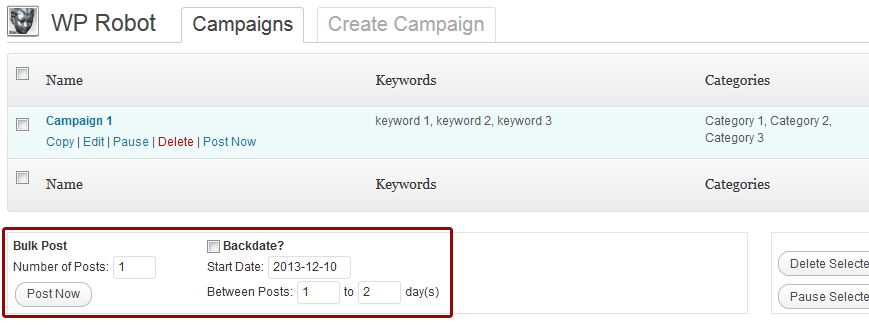
These instructions should make it easy for you to get started with using WP Robot. Once you feel comfortable with the basics discussed here head to the Templates page to modify the look of your posts or look into the many settings on the Options page. Most settings have a "?" button with explanations next to it. Use those! And don't hesitate to ask if you have questions.
Buy the Full Version (best value)
The full version of WP Robot 4 includes all 24 modules, can post content from 23 different sources and lets you earn commission from 9 affiliate networks! You may use the plugin on all your websites!
Buy a Custom Version
Build yourself a custom version of WP Robot 4 and select only the modules and features you need! Order 3 or more modules to get a rebate and free bonuses!
Your Advantages:
- Plugin will be delivered to you instantly after payment has been made!
- You have a 14 day money-back guarantee in case you are not satisfied - no questions asked!
- Free support via the WP Robot support forum and free updates included with every order!
- By making a purchase you agree to the terms of service.

